phenobook-server
phenobook-mobile
phenotypic data collection tool
Go to Phenobook web page
Documentation content
- What is Phenobook?
- Variables
- Creating Phenobooks
- Data Report
- User management
- Mobile application
- API
- Deploying you own Phenobook Server
- Compiling Phenobook Mobile
What is Phenobook?
Phenobook is an open source tool for field data collection. It allows researchers to record observations (including photos) in an organized way. Research groups can manage phenobooks by specifying their data structure and granting permissions to collaborators. It consists in two main modules: A server application (in php) and a mobile application (in Apache Cordova).In the server module, phenobooks are created and maintained, and in the mobile application, observations can be registered offline and syncronized later with the server.
Variables
Each Phenobook is a spreadsheet like document and each column is represented by a variable. Variables are created before creating a Phenobook, so different Phenobooks may share the same variables. This way it is possible to merge different Phenobooks results in the same report. To create variables, select the optionVariables in upper menu.
Click on Add button and insert the desired variable name, description, field type and whether the variable is informative.
Field type can be: Text, number, boolean, date, categorical and photo.
If a variable is selected as informative, it means that the data is known prior to make the observations. This will serve as a guide to the user when registering records (for example in a crop experiment, cultivar and repetition can be both informative variables, with field type categorical and numerical respectively).
Your can use your own standardized vocabulary for experimental variables here.
Adding categories to categorical variables
Categorical variables needs explicit specification of the categories it can contain. In order to add categories, go toVariables and in the table, click the Categories button next to the variable you want to specify (notice that the Categories button is only visible for Categorical variable type)
Creating Phenobooks
Once you have Variables specified, you can start to add Phenobboks. Go toPhenobooks menu in the upper menu and click on the Add button. Each Phenobook has a name, the quantity of experimental units (rows) an optional description and a set of variables. Once created, the Phenobook will be visible to all users within the same Group as the creator. The available actions for each created Phenobook are:
Inspect results
It shows a table with the data of the selected Phenobook. On the bottom you can see a summary indicating creation date, last update and the completeness percentage. By clicking on each cell you can access information about the registry. It contains how the data was taken (mobile or server), when, by who, and a historical record with all modifications done to the record (cells with historical record are highlighted). It is possible to fix a value (disable modification on mobile device) by clicking inFix this value button. It is also possible to change the value to a previous one by clicking on use this value on each historical record. You can also access a variable summary by clicking on each variable name. The summary structure depends on the variable data type.
There is also an option only visible for text variables, that allows the user to download a file with the variable content (you can add the file extension to the variable name in order to directly download the file with the desired extension)
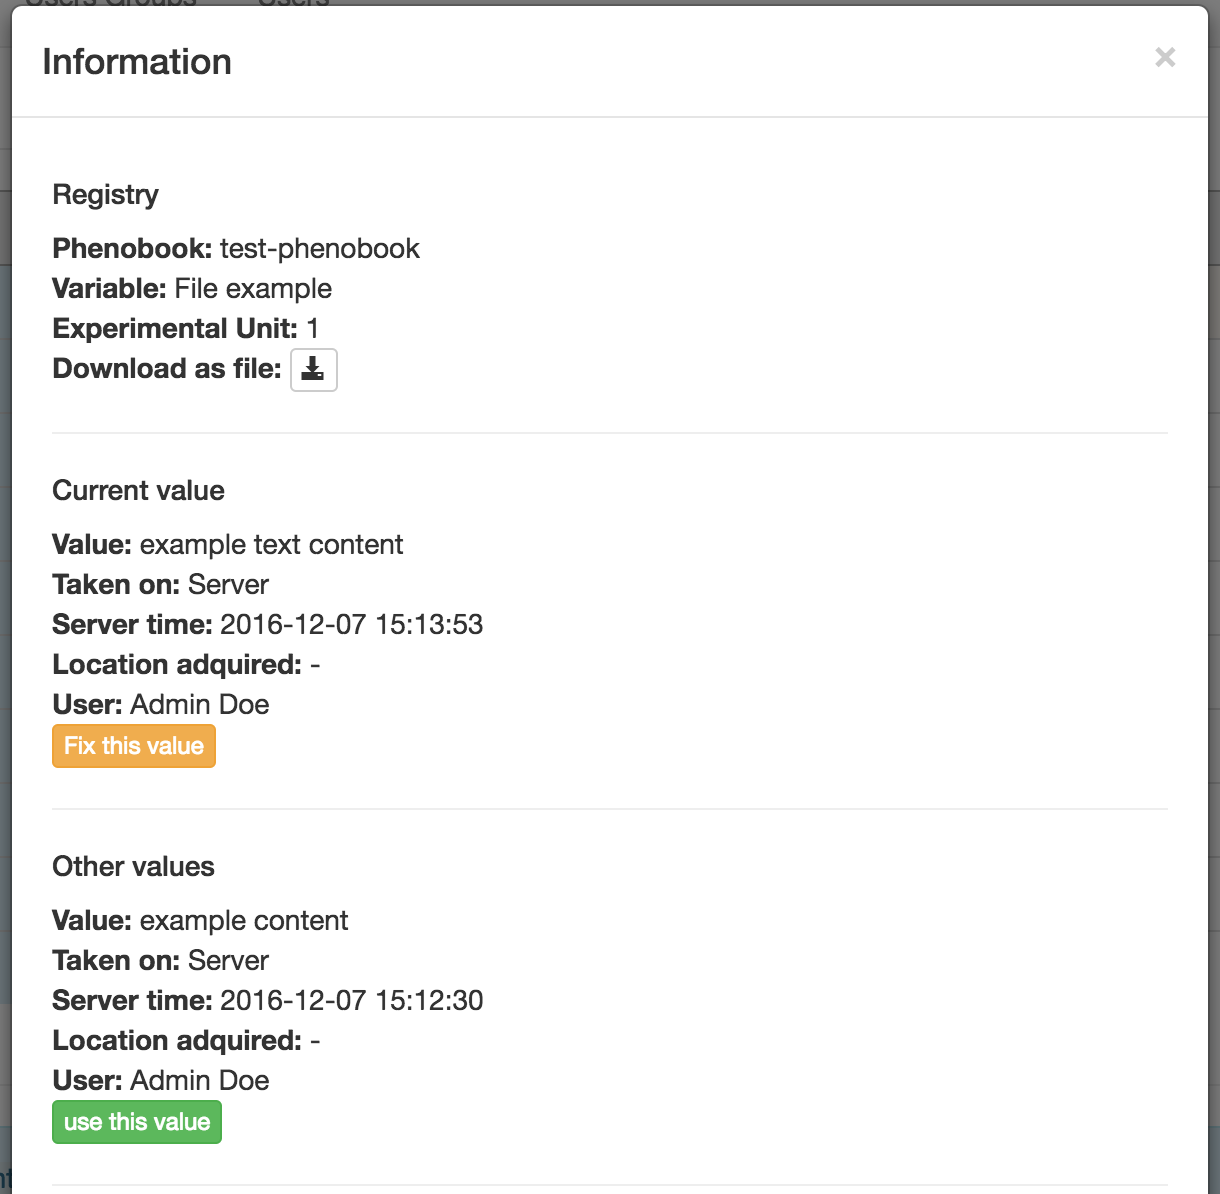 Fig. 1 Inspect modal screenshot
Importing from Excel - Load data manually
Observations can be registered from the Server application. This table allows to copy and paste from / to MS Excel, OpenOffice Calc and similar spreadsheet software. Information is automatically saved when changed, excepting the case when cell has a format error (ie. alfabetic characters in a numberic variable). In this case the cells are highlighted in red.
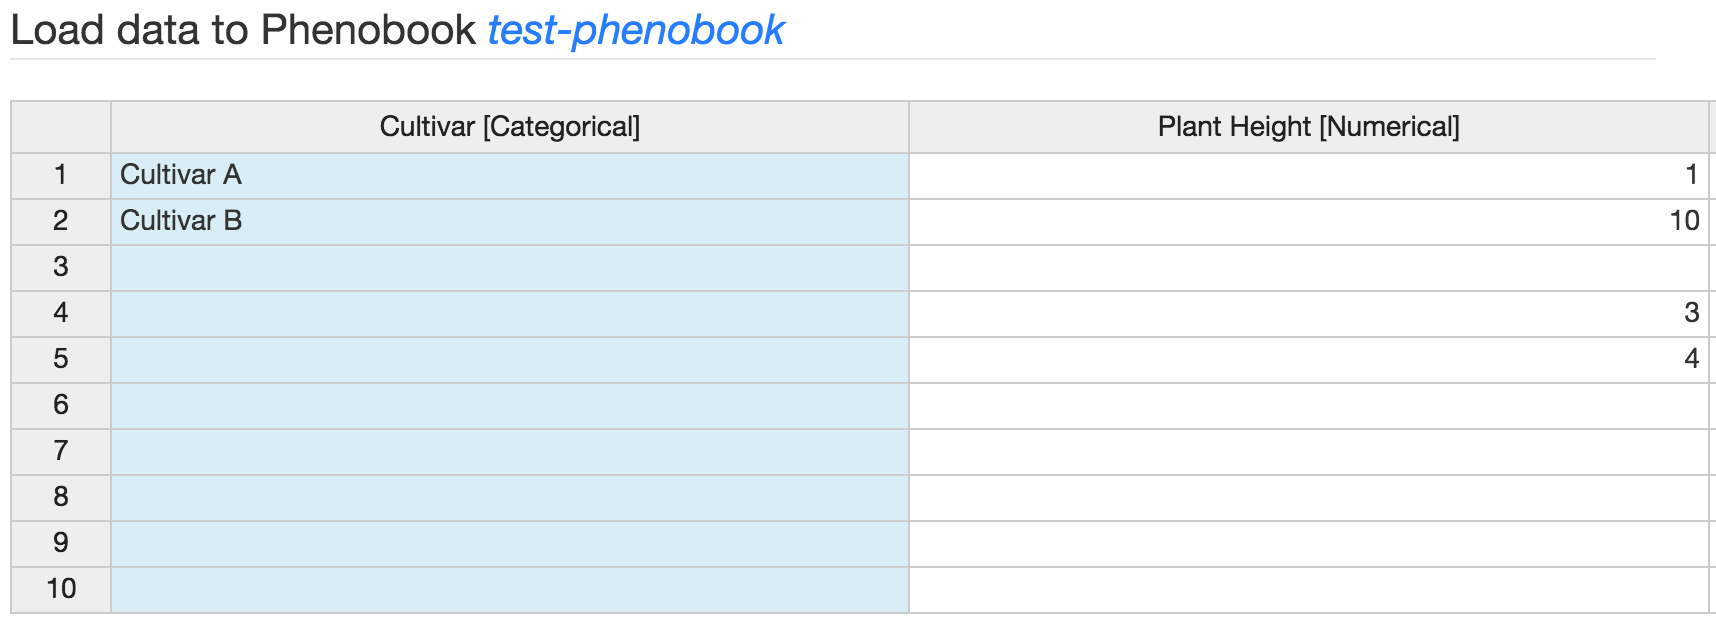 Fig. 2 Load data from server application
CSV export
By clicking in this option, the Phenobook data is exported to CSV (comma separated file) and can be opened by any spreadsheet program.
Edit
Allows the edition of the Phenobook information.
Data Report
It is possible to merge different Phenobooks data by accessing this option in the top menu. First you need to select which Variables you want to be shown. Once selected them, you can select as many Phenobooks as you want. It is possible to show the results or download a CSV file. In the results table, you can access record information by clicking on each cell, also a summary is provided when clicking on each variable name.
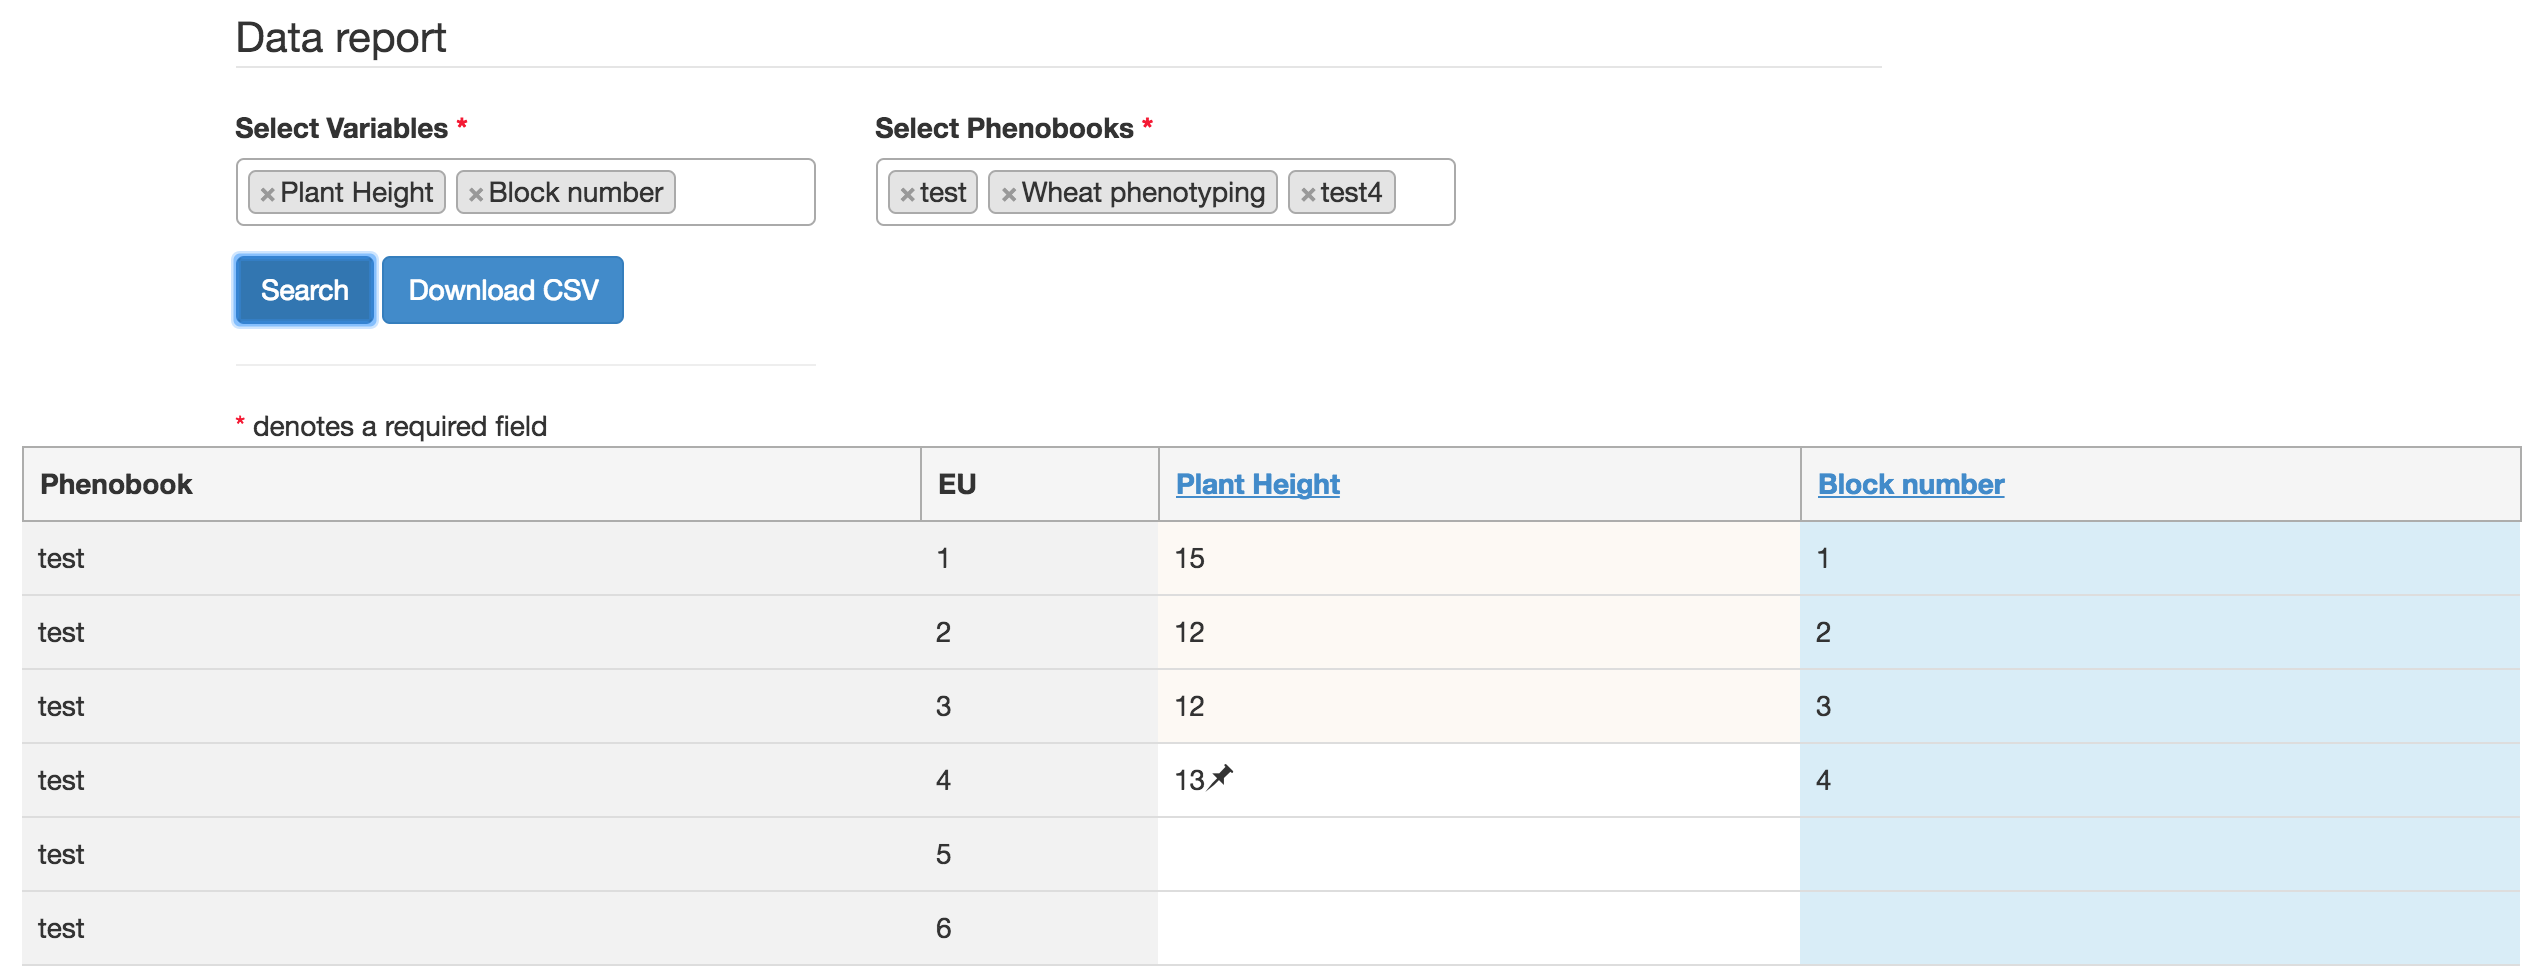 Fig. 3 Data report example
User management
User Types
A user can be non-administrator, administrator (can manage users within its user group) and super-administrator (can manage user groups).
User Groups
Users are organized in User Groups. This structure allows one single installation of Phenobook Server work for large organizations where multiple working groups work separately. Phenobooks are only visible for users that belong to the same User Group that the user that created it. In order to add or editUsers Groups you can access the option with the same name in the top menu (if you are a super-administrator).
Creating users
When adding new users, besides personal and access information and check whether the user is administrator. The user is automatically linked to the User Group the creator belongs to.
Mobile application
Installing
For Android devices, you can download the official application from Google Play Store here, or download the APK file here. For Iphone users, you can go to the app store link here. If you are using a custom server, it is important to indicate its address in thesettings button. Otherwise Phenobook Mobile will try to connect to a different server.
 Fig. 4 Application data input preview
Compiling
Mobile application is developed in Apache Cordova, compiling for plenty devices can be done by following this documentation. Apache Cordova and its dependencies as required for development of the mobile application. Installation is described here.
Usage
Phenobook Mobile is created to save observations offline and syncronizing when a connection is available. First time you open the application, it is required to make an initial update, for this you need to enter a valid username and password. Existing Phenobooks will be downloaded and accessible on the application once the user log in. You can take observations by simply selecting the Phenobook name and clickingLoad data button. You can change the variable and experimental unit from the top selectors and put the value in the bottom field. The value is saved automatically if the variable or experimental unit is changed. If you want to see a results table, you can press the See table button.
Updating
It is required to enter log in credentiales before updating. By clicking theUpdate button in the main screen, records locally saved are sent to the server and records taken by others are downloaded to the application.
API
It is possible to query and update the database via an HTTP API. In order to make a request to the API it is required to pass the user's user and password, as well as some other parameters. Notice that the API will only return data associated with the current user's group. In this example we request all the variables, the response is a json representation of the objects:
GET
http://getphenobook.com/api/get-variables.php?user=testuser&pass=testpassword
          [{"name":"Cultivar","required":"0","description":"","userGroup":{"name":"Default","id":"1","active":"1"},"fieldType":{"name":"Categorial","type":"2","id":"2","active":"1"},
          "isInformative":"1","id":"5","active":"1"}]
| Name | URL | Parameters | Description |
|---|---|---|---|
| Phenobook Variables | api/export-phenobooksVariables.php | user, pass | Will return an associative array of phenobooks and its variables. |
| User Group | api/export-userGroups.php | none | Will return all user groups |
| Users | api/export-users.php | user, pass | Will return all user corresponding to the user's group |
| Variables | api/export-variables.php | user, pass | Will return all variables available for the user's group |
| Registries | api/export-registries.php | user, pass, phenobook (optional, the phenobook id), variable (optional, the variable id), experimental_unit (optional, the experimental unit number). | Will return all registries by default. It is possible to specify phenobook, variable or experimental unit. |
| Phenobook | api/export-phenobooks.php | user, pass | Will return all the active phenobooks of the user groups |
| Import registry | api/import-registry.php | user, pass, experimental_unit, variable_id, phenobook_id, value | Will save value as a new record in specified phenobook, variable and experimental unit. |